Auto/ON switch – in flight
ON-mode vs AUTO-mode logic – in flight
In ON-mode, both the CanopyFlasher and FuselageFlasher are always flashing in a 2-flash per 1,5 second sequence. If a Flarm traffic nears within 3km, or a Flarm warning occurs, the system automatically adapts to a flashing timing more rapidly and more aggressively.
In AUTO-mode, Nexus calculates when to activate automatically. This is a power saving mode. If traffic behind you causes a Flarm warning, it may not be useful to activate the forward CanopyFlasher. FuselageFlasher is always active when traffic nears to within 3km or when a Flarm warning occurs, regardless of the traffic direction. Depending on the vertical- and horizontal distance and the warning level the flashing increases in intensity:
Nexus logic |
ON-
mode |
ON/AUTO – Traffic <3km |
ON/AUTO – Level 1 warning |
ON/AUTO – Level 2 warning |
ON/AUTO – Level 3 warning |
Flash timing |
2 flashes /
1,5 sec |
2 flashes /
1 sec |
2 flashes /
1 sec |
3 flashes /
1 sec |
4 flashes /
1 sec |
CanopyFlasher “AUTO” logic – in flight
If traffic is received in the forward 90 degree horizontal and +/- 30 degree vertical sector of the aircraft, and within 3km distance the CanopyFlasher will already activate in a 2-flash per second sequence.
When an actual traffic warning (low, medium or high, as triggered by Flarm) is activated due to a target in the forward 90 degree sector of the aircraft, the CanopyFlasher will start flashing more rapidly: 2 to 4 times per second, depending on the warning level (see above).
FuselageFlasher “AUTO” logic – in flight
If traffic is received anywhere within 360 degrees around the aircraft, and within 3km distance, the FuselageFlasher will activate in a 2-flash per second sequence.
When an actual traffic warning (low, medium or high, as triggered by Flarm) is activated, the FuselageFlasher will start flashing more rapidly: 2 to 4 times per second, depending on the warning level (see above).
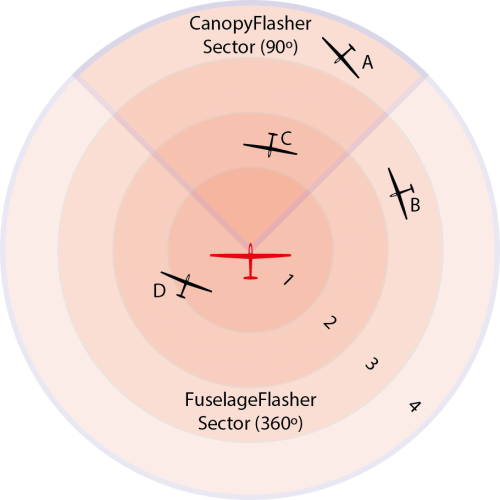
Example:
(CF = CanopyFlasher, FF = Fuselage Flasher)
Glider A is flying in forward sector 4 (starts at <3km):
Both CF and FF activate – 2 flashes per second.
(Flarm traffic advisory – usually no audio warning)
Glider B is flying in sector 3:
Only FF flashes – 2 flashes per second.
(low level Flarm warning)
Glider C is flying in forward sector 2:
Both CF and FF flash – 3 flashes per second.
(medium level Flarm warning)
Glider D is flying in sector 1:
Only FF flashes – 4 flashes per second
(high level Flarm warning)
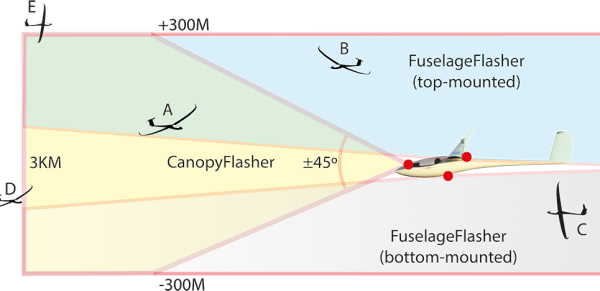
Example:
Glider A is flying in the CanopyFlasher Sector (90º x +/- 30º): both CF and FF are active.
Glider B and C cannot see the CanopyFlasher: only the FuselageFlasher is active.
Glider D is more than 3km away: CanopyFlasher and FuselageFlasher are not yet activated.
Glider E is flying within 3km and within the 30 degree CF-sector, but more than 300m higher: CanopyFlasher is not yet activated, however the FuselageFlasher is already active.
Please always manually select ON-mode when visibility is degraded or potentially dangerous situations may exist. Examples of these are, but are not limited to: flying close to cloud base, running under cloud streets, flying along mountain ridges, white snowy mountainous areas, lot’s of VFR traffic, competitions, circuit and landing, low standing sun, close to sunset, etc. The extremely bright red LEDs really stand out well in greyed out conditions. Never fully rely on “AUTO-mode”: your Flarm reception may be poor, or someone else’s Flarm signal may be weak! It may also protect you from General Aviation traffic without Flarm!